Shopify integration for Uniform Mesh
Shopify is a complete commerce platform that lets you start, grow, and manage a business.
This integration allows business users to build personalized landing pages and storefronts by repurposing product content from your Shopify store and enables developers to use modern performance-optimized front-end tooling like Next.js and have a fantastic developer experience.
Pre-requisites
- Make sure you have developer access to Shopify and either an API access token created, or ability to create a new one.
- Uniform account with at least one project. Signup for free here.
Access token
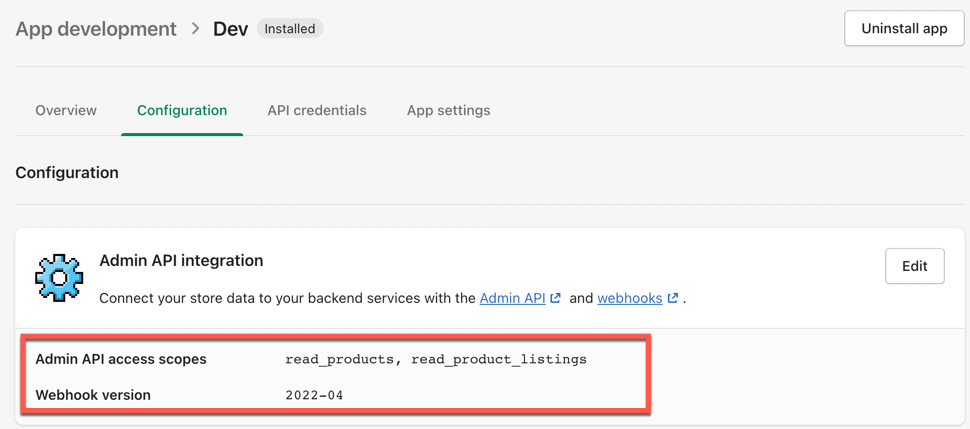
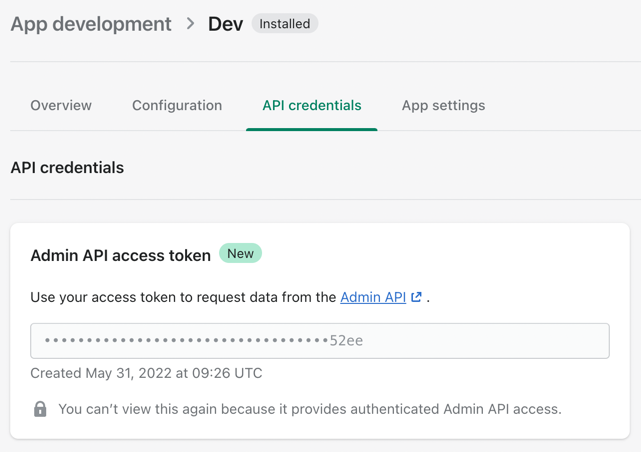
You would need to create a read-only Admin API Acess Token in Shopify (learn more here in the official documentation)
important
The access token specified must have both read_products and read_product_listings permissions.
After the token is created, we will be using it to setup the integration.
Step 1: Install and configure the integration
Locate the Shopify integration in the list of available integrations within your Uniform project's
Settings->Integrations:
Click on the plus icon to install the integration.
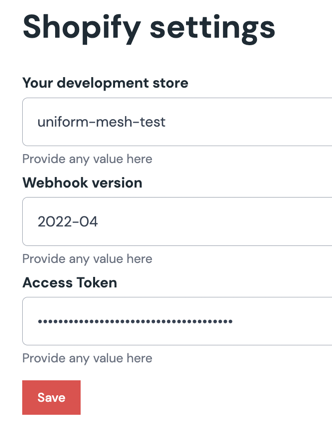
After the installation, the empty configuration screen will display, fill out the configuration settings as described:
Your development store: your shopify store id

Webhook version: value should be displayed where you created your Admin API Access Token
Access Token: your read only Admin API Access Token
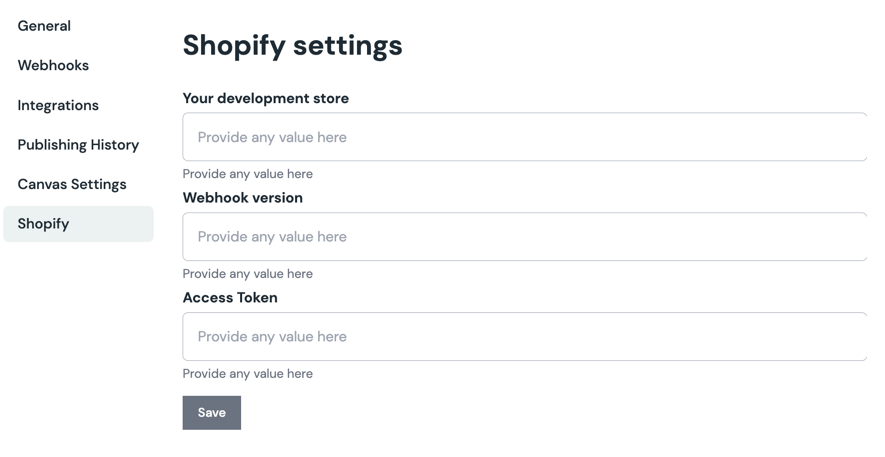
Click "Save". That's it, the configuration is installed and configured.
Step 2: Create a component parameter
Now let's connect the product data with one of your components in Canvas.
The integration ships with two types of Shopify parameters, each targeting a specific scenario:
- Shopify Product Search
- Shopify Product Query
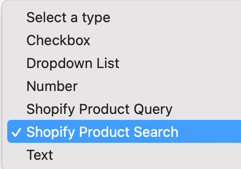
"Shopify Product Search" parameter type
Allows to pick one or many products from a specific catalog. This type saves a specific product selection within a given parameter.
- Let's add a new parameter to any of the existing or new components in Canvas Component library.
For example, let's create a new component called Product and add a new parameter:
Specify a name "Product" (remember the name as we will be referring to it from our component's front-end code using
Public ID).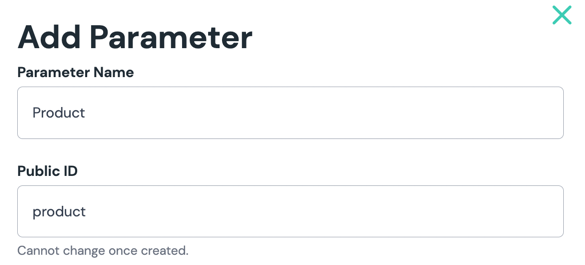
Pick the "Shopify Product Search" parameter type from the list of types and select specific product types (if you'd like). This will control product types in the filter when the parameter value is set.
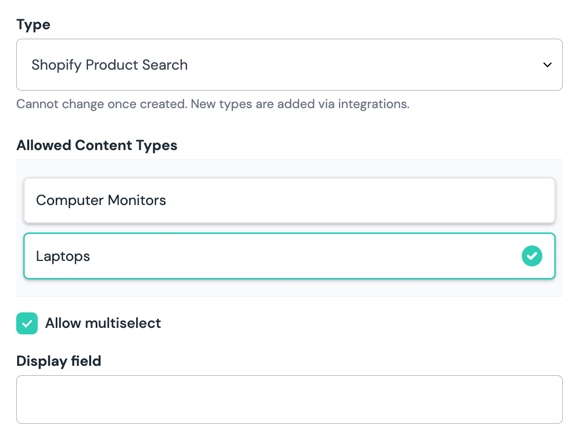
You have a choice to allow multi-selection or not (if you are building a product list component, you will likely need the multi-selection).
Optional: If you'd like to override what is displayed in as product title within the composition editor, consider setting the
Display field.
Make this component a composition component by toggling the Composition checkbox.
Unless you have other composition component already, then allow this component into a slot of another composition component.
In order to create an instance of this component, head over to the Composition section and create a new composition.
After the composition is created and the newly created/modified component with the
Productparameter is placed, you should be able to see the following experience, allowing to pick one or many products from your catalog and save the component: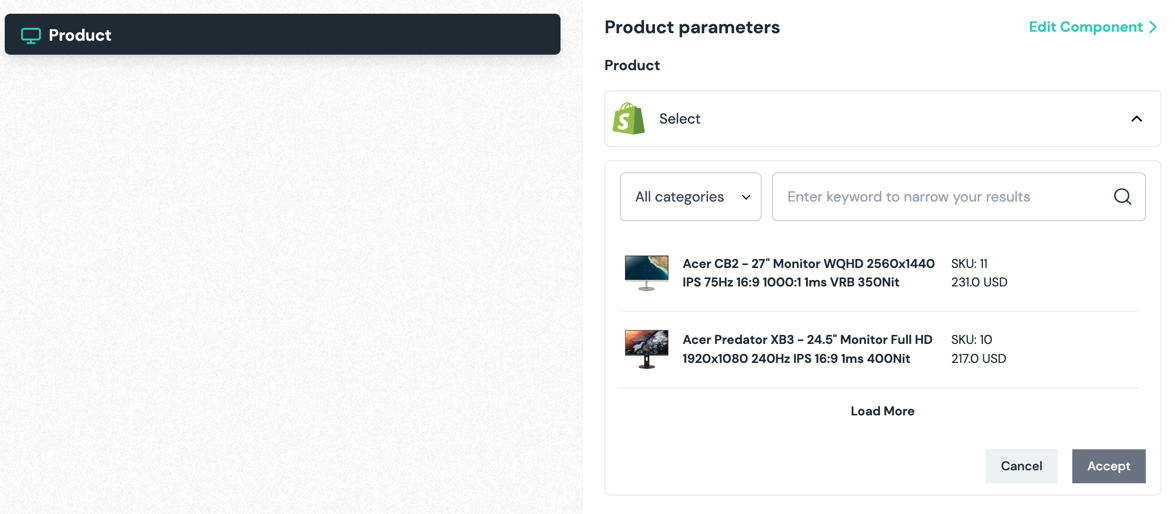
"Shopify Product Search" parameter value
If you are wondering what value does Uniform store, here is a sample below. The value includes the product id in a given catalog, the id of the catalog and the API version.
important
Uniform doesn't store the actual product details data. This is a job of an Enhancer to resolve at build-time or run-time, depending on your application architecture. Enhancers can be added to your web app, or deployed separately as an API proxy. The section below describes how the enhancers are added.
{
  "type": "shopify-product-search",
  "value": {
  "entryIds": [
    "6757359091791"
    ]
  }
}
"Shopify Product Query" parameter type
Allows to create a query criteria for your product catalog.
In contrast to the Shopify Product Search type, this parameter type does not persist the specific product matches,
and it saves the search criteria iteself, which allows to defer the product selection to runtime.
The process of adding the Shopify Product Query parameter is identical to the one described above.
The difference is in the way the component UX is implemented and what value is stored in Uniform.
The UX of this parameter type allows to configure a query criteria:
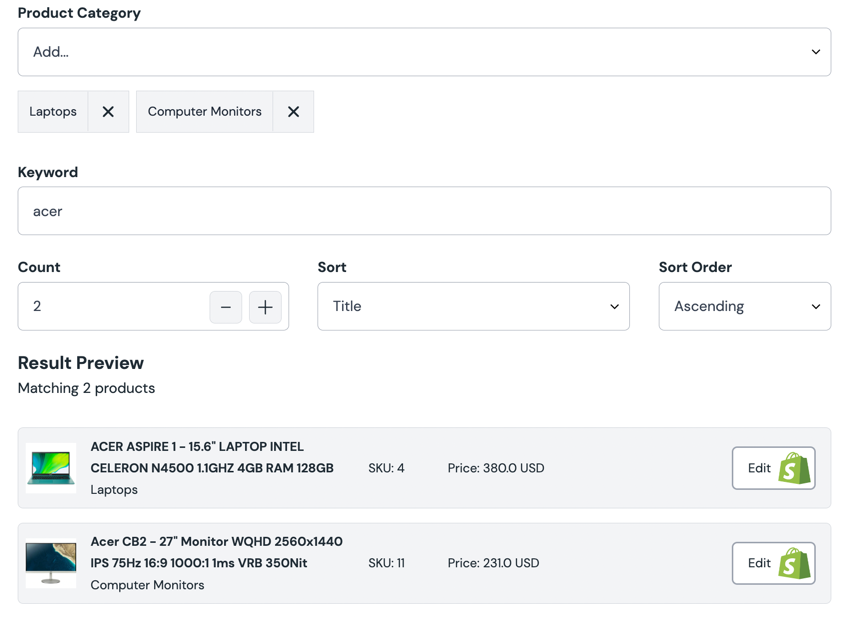
"Shopify Product Query" parameter value
If you are wondering what value does Uniform store, here is a sample below. The value includes the query criteria parameters, if specified:
- product categories
- search keyword
- sort order
- count
important
Uniform doesn't store the actual product details data. This is a job of an Enhancer to resolve at build-time or run-time, depending on your application architecture. Enhancers can be added to your web app, or deployed separately as an API proxy. The section below describes how the enhancers are added.
{
      "type": "shopify-product-query",
      "value": {
        "options": {
          "count": 3,
          "categories": [
            "Laptops"
          ],
          "brand": "",
          "keyword": "Lenovo",
          "sort": "TITLE",
          "sortOrder": "asc"
        }
      }
}
What else can you do?
Now that you have the components that are connected to your commerce content, you can leverage Uniform Personalization and A/B testing, as well as activating the Shopify integration with your web application.
Step 3: Wire up your app
tip
Before wiring up your app, please make sure to get familiar with the concept of Data Enhancers. This chapter will walk you through the process of adding Shopify specific enhancers to your web application.
Pre-requisites
Make sure you already have a web application wired up to Canvas with Uniform API key and Project Id in the env vars.
If you don't have the Canvas enabled app up and running yet, please go through one this tutorials:
Adding Shopify enhancers to a Next.js app
info
This tutorial will use a Next.js application as an example, but the same concepts apply to any other JavaScript framework.
Install our Data Enhancer for Shopify with this command:
npm install @uniformdev/canvas-shopifyAdd the following Shopify specific environment variables to your web app's .env file:
 SHOPIFY_DEVELOPMENT_STORE=your-store-name
 SHOPIFY_WEBHOOK_VERSION=2022-04
 SHOPIFY_ACCESS_TOKEN=access-token
important
The access token specified must have both
read_productsandread_product_listingspermissions.Find the location where you retrieve your page content. In a Next.js app, this is typically a page file under
/pages(index.tsx,[slug].tsx, etc.)Find the location of the
getStaticPropsorgetServerSidePropsfunction (depending on what you use).Add the following lines of code after the code that retrieves the raw composition from Canvas APIs:
- A: import ehnancer for Shopify
- B: run the enhance function, with will return post-enhanced composition
- C: register enhancer for Shopify
- D: return the post-enhanced composition as a page prop
// A. import ehnancer for Shopify
import { shopifyEnhancer, SHOPIFY_PARAMETER_TYPES } from '@uniformdev/canvas-shopify';

export async function getStaticProps(context: GetStaticPropsContext) {
  // retrieving the raw composition content form Uniform Canvas API, before enhancing
  const compositionId = context?.params?.compositionId ?? '';
  const compositionString = Array.isArray(compositionId) ? compositionId.join('/') : compositionId;
  const { composition } = await canvasClient.getCompositionById({ compositionId: compositionString });

  // B: run the enhance function, with will return post-enhanced composition
  await enhance({
    composition,
    // C: register enhancer for Shopify:
    enhancers: new EnhancerBuilder().parameterType(SHOPIFY_PARAMETER_TYPES, shopifyEnhancer()),
    context,
  });

  // D: return the post-enhanced composition as a page prop
  return {
    props: {
      composition,
    },
  };
}
Please note that your way of reading the environment variables may be different.
success
Congratulations! You successfully added Shopify Mesh integration to your Uniform project and your Uniform Canvas-enabled app. Now the composition JSON is expected to contain the data from Shopify, and you can proceed building amazing front-end experiences.
Next steps
If you haven't already done so, activate Personalization and A/B testing within your app by following this tutorial. This will enable your business users to personalize shopping experiences without developer effort.