Akamai setup
This section explains how to configure and enable edge-side personalization on Akamai.
Before you start
You must have the following available in order to complete the instructions in this section:
- Entitlement for EdgeWorkers in your Akamai contract. Akamai documentation has more details.
- Administrator access to Akamai Control Center.
- Ability to clone a GitHub repository.
- Node.js v14+ installed locally.
- pnpm installed locally.
Configure CLI
The Akamai CLI enables you to send commands to Akamai without having to log into the Akamai Control Center. Entering commands on the CLI is faster than having to navigate through a lot of different screens in the Control Center.
tip
All of the required configuration can be accomplished using the Akamai Control Center, which gives you a GUI to work in. Using the CLI allows you to write scripts to automate the configuration, backup and recovery processes.
Akamai also offers an API that you can use as an alternative to the CLI.
Create API client
An API client provides the credentials the CLI will use in order to send commands to Akamai. You can create an API client in the Akamai Control Center.
Identify the home directory on your local machine.
- Windows
- MacOS/Linux
Open a PowerShell terminal and enter the following command to find your home directory:cd ~Enter the following command to find your home directory:cd ~About this step
The CLI runs on your local machine. It uses settings from a file located in your home directory.
Create a file in your home directory
.edgercAdd the following to the file:
[papi]

[default]
Log into the Akamai Control Center.
Navigate to ACCOUNT ADMIN > Identity & access
Click Create API client
For the API client type select Myself
Click Quick
Find the section Credentials
Click Copy credential
Paste the contents of your clipboard into the file
.edgercunder the sections papi and default. The file should look like the following:[papi]
client_secret = ????????????????????????????????????????????
host = ??????????????????????????????????????????????????????????
access_token = ????-????????????????-????????????????
client_token = ????-????????????????-????????????????
[default]
client_secret = ????????????????????????????????????????????
host = ??????????????????????????????????????????????????????????
access_token = ????-????????????????-????????????????
client_token = ????-????????????????-????????????????Save the file.
Install CLI
The Akamai CLI is a small program that must be installed on your local machine.
Install the Akamai CLI.
Open a CLI & enter the following commands:
akamai install edgeworkers
akamai install property-manager
About this step
The CLI is a generic tool. You have to install the functionality you want to use. This adds the commands to interact with EdgeWorkers and the Property Manager.
Retrieve settings
Before you can create a new property in Akamai, there are a few settings you must retrieve using the CLI:
| Setting | Retrieval instructions | More information |
|---|---|---|
| Contract ID | Get contract ID | Akamai docs |
| Product ID | Get product ID | Akamai docs |
| Group ID | Get group ID | Akamai docs |
| Resource tier | Get resource tier | Akamai docs |
Contract ID
akamai property-manager list-contracts --format json
You will get a response like the following:
[
    {
        "contractId": "ctr_P-1234567",
        "contractTypeName": "DIRECT_CUSTOMER"
    }
]
Using the example above, the contract is is P-1234567.
You must remove the ctr_ from the value.
Product ID
akamai property-manager list-products \
    --contractId <YOUR CONTRACT ID> \
    --format json
You will get a response like the following:
[
    {
        "productName": "Fresca",
        "productId": "prd_Fresca"
    }
]
Using the example above, the product ID is Fresca.
You must remove the prd_ from the value.
Group ID
akamai property-manager list-groups --format json
You will get a response like the following:
[
    {
        "groupName": "engineering",
        "groupId": "grp_2222222",
        "parentGroupId": "grp_1111111",
        "contractIds": [
            "ctr_P-1234567"
        ]
    },
    {
        "groupName": "My-Company-P-1234567",
        "groupId": "grp_1111111",
        "contractIds": [
            "ctr_P-1234567"
        ]
    }
Using the example above, the available group IDs are 1111111
and 2222222. You must remove the grp_ from the value.
tip
If you are unsure which group ID to use, select the one with a group name that matches your contract id. That is the top-level group.
Resource tier
akamai edgeworkers list-restiers --contractId <YOUR CONTRACT ID>
The response is more complex than the responses for the other CLI commands. There is a numbered list of resource tiers, and under each tier is a detailed description of the features of that tier.
In the example below, the resource id is 200:
----------------------------------------------------------------------------
--- The following Resource Tiers available for the contract id P-1234567 ---
----------------------------------------------------------------------------
1. ResourceTier 200 - Dynamic Compute
Maximum CPU time during initialization: 60 ms
Maximum wall time during initialization: 200 ms
Maximum memory usage per event handler: 1.5 MB
Maximum CPU time per event handler: 10 ms
Maximum wall time per event handler: 4 s
...
Create EdgeWorker ID
An EdgeWorker ID uniquely identifies your EdgeWorker. Even though you haven't created the EdgeWorker yet, you can still create the ID and associate the EdgeWorker with the ID later.
Determine a name for your EdgeWorker.
About this step
You might want to use your domain name in order to make it easy for other Akamai administrators to understand the purpose of the EdgeWorker.
In the CLI, enter the following command:
akamai edgeworkers create-id \
    <GROUP ID> <EDGE WORKER NAME> \
    --resourceTierId <RESOURCE TIER ID>
About this step
Unlike in other places when you specify the group ID, in this command you do not use the
--groupIdswitch.The output from the command will include a value edgeWorkerId. Note this value. You will need it when you create your Akamai property.
Clone repository
Clone the following repository:
https://github.com/uniformdev/uniform-edge-akamai-edgeworkers-starter
About this step
This repository includes files that you will use to configure an EdgeWorker and property in Akamai.
Write EdgeWorker code
Uniform provides the source code for a fully functional EdgeWorker that executes Uniform personalization instructions.
tip
For more information on EdgeWorkers see:
- Akamai EdgeWorkers User Guide for a detailed tutorial on how to create an EdgeWorker.
Open a terminal window in the folder
workerin the root of the repository you cloned.Enter the following command:
pnpm installCreate a file
.envwith the following environment variables:Variable name Value AKAMAI_WORKER_IDThe EdgeWorker ID you created in the previous section. AKAMAI_WORKER_NETWORKThe Akamai network you want to activate the EdgeWorker on. This must be one of the following: STAGINGPRODUCTION
AKAMAI_WORKER_VERSION_INCREMENTThe script automatically increments the EdgeWorker version number. This variable determines how the new version number is determined. This must be one of the following: majorchanges 1.0.0 to 2.0.0minorchanges 1.0.0 to 1.1.0patchchanges 1.0.0 to 1.0.1
UNIFORM_PROJECT_IDThe Uniform project whose manifest is retrieved. UNIFORM_API_KEYThe Uniform API key used to retrieve the manifest.
Deploy EdgeWorker
The repository you cloned contains a number of scripts that automate the process of deploying an EdgeWorker.
tip
You do not have to use these scripts. You can deploy the EdgeWorker using whatever tools and approach you prefer.
Enter the following command:
pnpm worker:version:prepareAbout the step
This npm script performs the following tasks:
- Downloads the Uniform manifest.
- Increments the version number for the EdgeWorker.
- Builds the EdgeWorker.
Enter the following command:
pnpm worker:version:deployAbout this step
This npm script performs the following tasks:
- Creates the TAR archive file.
- Uploads the file to Akamai using the Akamai CLI.
- Builds the EdgeWorker.
Enter the following command:
pnpm activate:versionAbout this step
This npm script activates the new version of the EdgeWorker on the specified Akamai network using the Akamai CLI.
The EdgeWorker can take 15 minutes or longer to activate. You can check the status of the activation process using the following command:
pnpm worker:statusAbout this step
When the status for your version is
COMPLETE, and it is the version at the top of the list (or has the greatest value foractivationId), that means your version is active.
Identify your origin
Akamai runs personalization by making a request to the origin (i.e. your web application) and executing the personalization instructions associated with that page (i.e. what you have configured using Uniform Context).
You have several options for where to deploy your web application.
tip
As long as Akamai can access your web application using https, you can host your app anywhere you like. The options described below are popular options.
Akamai NetStorage
NetStorage is Akamai's globally distributed cloud storage solution. You can use NetStorage as the origin and use Akamai as both a host and a CDN.
info
Coming soon
AWS S3 Buckets/Cloudfront
These instructions assume the following:
- Your web application is already deployed to an S3 bucket.
- Cloudfront is configured to provide public access to the contents of the S3 bucket using https.
- You have administrator access to the S3 bucket and Cloudfront.
In Cloudfront, open your distribution.
Copy the Distribution domain name.
About this step
This is the URL you can use to access your site through Cloudfront. To Akamai, this URL is the origin. The hostname from the URL is the value you will need when configuring Akamai.
Azure Static Web Apps
Akamai has a partnership with Microsoft that enables high-speed access to Azure resources from Akamai's network. As a result, Akamai can use an Azure Static Web App as the origin without the kind of network latency you might expect when multiple clouds are involved.
info
Coming soon.
Configure certificate
In order to serve files to your visitors, Akamai needs a certificate that matches your domain name. Akamai supports multiples types of certificates.
SAN certificates
A SAN certificate is a single certificate that can support multiple domains. By adding your hostname as a subject alternative name (SAN) on the certificate, Akamai can use this certificate with your domain.
Log into Akamai Control Center.
Navigate to CDN > Certificates.
In the row for your certificate, click Actions > View and Edit Certificate.
In the section Enter Certificate Information, click Edit.
In the field SAN (optional), enter the hostname for your site.
About this step
This should be the hostname visitors use to access your site.
Click Update.
Click Submit.
Click Go.
Click Validate Domain Control.
About this step
Akamai gives you several options for how you can prove that you have control of the domain. Follow the instructions you prefer.
Click Check status now.
About this step
You should see Valid next to the hostname in the list of domains.
Akamai submits a request for a certificate to be generated and deployed. This can take 15 minutes or longer. But eventually you will see your certificate has been deployed to production.
Configure property
In Akamai, a property represents all of the configuration that Akamai uses to determine how to handle requests for your web application. This includes things like when to use caching and when to use the EdgeWorker.
Determine CP code
When you create your Akamai property, you must specify a CP code. This value allows you to classify the traffic Akamai handles, which is useful for billing, reporting, logging and other purposes.
You can create a new CP code or use an existing one.
- Create new
- Use existing
You can create a new CP code using the CLI.
Enter the following command:
akamai property-manager create-cpcode \
    --contractId <YOUR CONTRACT ID> \
    --groupId <GROUP ID> \
    --productId <PRODUCT ID> \
    --cpcodeName <CP CODE NAME>
About this step
This command creates the new CP code, but it displays no output. You must run another command to get the CP code ID.
Enter the following command:
akamai property-manager list-cpcodes \
    --contractId <YOUR CONTRACT ID> \
    --groupId <GROUP ID>
About this step
This is the same command from the previous section. You will see your new CP code in the list. The CP code ID is follows
cpc_. You must remove thecpc_from the value.
You can find the ID for an existing CP code using the CLI.
akamai property-manager list-cpcodes \
    --contractId <YOUR CONTRACT ID> \
    --groupId <GROUP ID>
You will get a response like the following:
╒═════════════╤════════════════════╤═════════════╤══════════════════════╕
│"ID"         │"Name"              │"Product IDs"│"Creation Date"       │
╞═════════════╪════════════════════╪═════════════╪══════════════════════╡
│"cpc_1111111"│"my-domain-1"       │"prd_Fresca" │"2021-08-25T15:37:40Z"│
├─────────────┼────────────────────┼─────────────┼──────────────────────┤
│"cpc_2222222"│"my-domain-2"       │"prd_Fresca" │"2021-08-26T03:12:55Z"│
├─────────────┼────────────────────┼─────────────┼──────────────────────┤
│"cpc_3333333"│"my-domain-3"       │"prd_Fresca" │"2021-09-03T02:42:40Z"│
└─────────────┴────────────────────┴─────────────┴──────────────────────┘
Using the example above, there are 3 CP codes available in the
group. The CP code ID is follows cpc_. You must remove the
cpc_ from the value.
About this step
If there are no CP codes available, or you cannot find one that you want to use, you can create a new CP code.
If you are going to use one of the CP codes list above, note the ID and skip to Configure property.
Create property
This section covers how to create a new property in Akamai.
info
If you already have a property that you want to use, skip to Import Property.
Enter the following command:
akamai property-manager new-property \
    --contractId <YOUR CONTRACT ID> \
    --groupId <GROUP ID> \
    --productId <PRODUCT ID> \
    --property <PROPERTY NAME>
About this step
This will create a new property in Akamai and create a folder on your machine with property name. In this folder you will find a number of files that contain the various default settings that Akamai uses for new properties.
Import property
info
If you created a new property in the previous section, skip to Update Property.
caution
You can use an existing Akamai property if you like, but you will be replacing most of the settings on the property. If the property is used for other purposes, you should review the changes described in this documentation carefully.
Enter the following command:
akamai property-manager import --property <PROPERTY NAME>
About this step
This creates a folder on your machine with property name. In this folder you will find a number of files that contain the various settings that are current configured on the property.
Update property
Regardless of whether you created a new property or are using an existing property, the property already has some configuration settings. These settings need to be updated in order for the EdgeWorker (which you still haven't created yet) to be used.
Enter the following command:
akamai property-manager set-default --property <PROPERTY NAME>About this step
From now on, when you enter commands on the CLI, if you do not specify a property explicitly, this property name will be used.
Delete the files in the folder
config-snippets.About this step
These files represent the current property settings. You will replace these settings.
In the repository you cloned, copy the files from
cli/property/config-snippetsto the folder you deleted the files from in the earlier step.Open the file
config-snippets/main.json.Replace the following placeholders with the settings you retrieved earlier:
<ORIGIN HOSTNAME><CP CODE NAME><PRODUCT ID><CP CODE NAME>
Open the file
config-snippets/EW_HTML_Pages.json.Replace the following placeholders with the settings you retrieved earlier:
<EDGEWORKER ID>
Enter the following command:
akamai property-manager saveAbout this step
This will update the property in Akamai using the settings from your local files.
Configure property hostname
info
In most cases this section only applies if you created a new property. An existing property will probably already have a hostname configured. If your property has a properly configured hostname, you can skip this section.
Log into Akamai Control Center.
Navigate to CDN > Properties.
Click your property.
Click on the latest version.
In the section Property Hostnames, tick the checkbox next to your hostname.

Click Edit Selected.
Click Next.
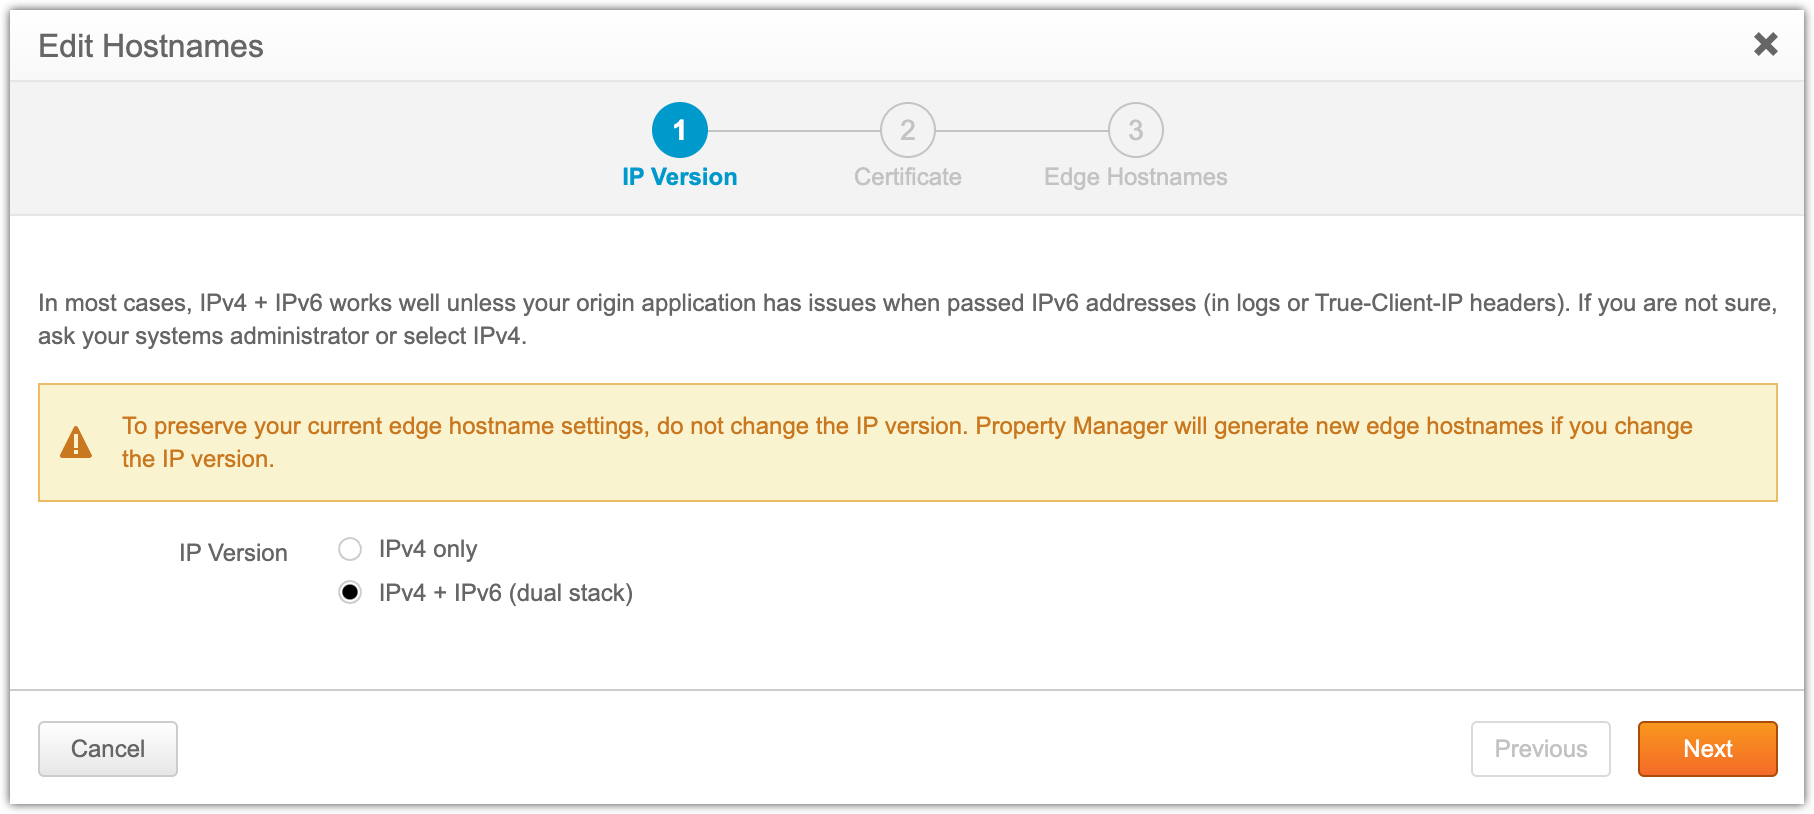
Select your certificate.
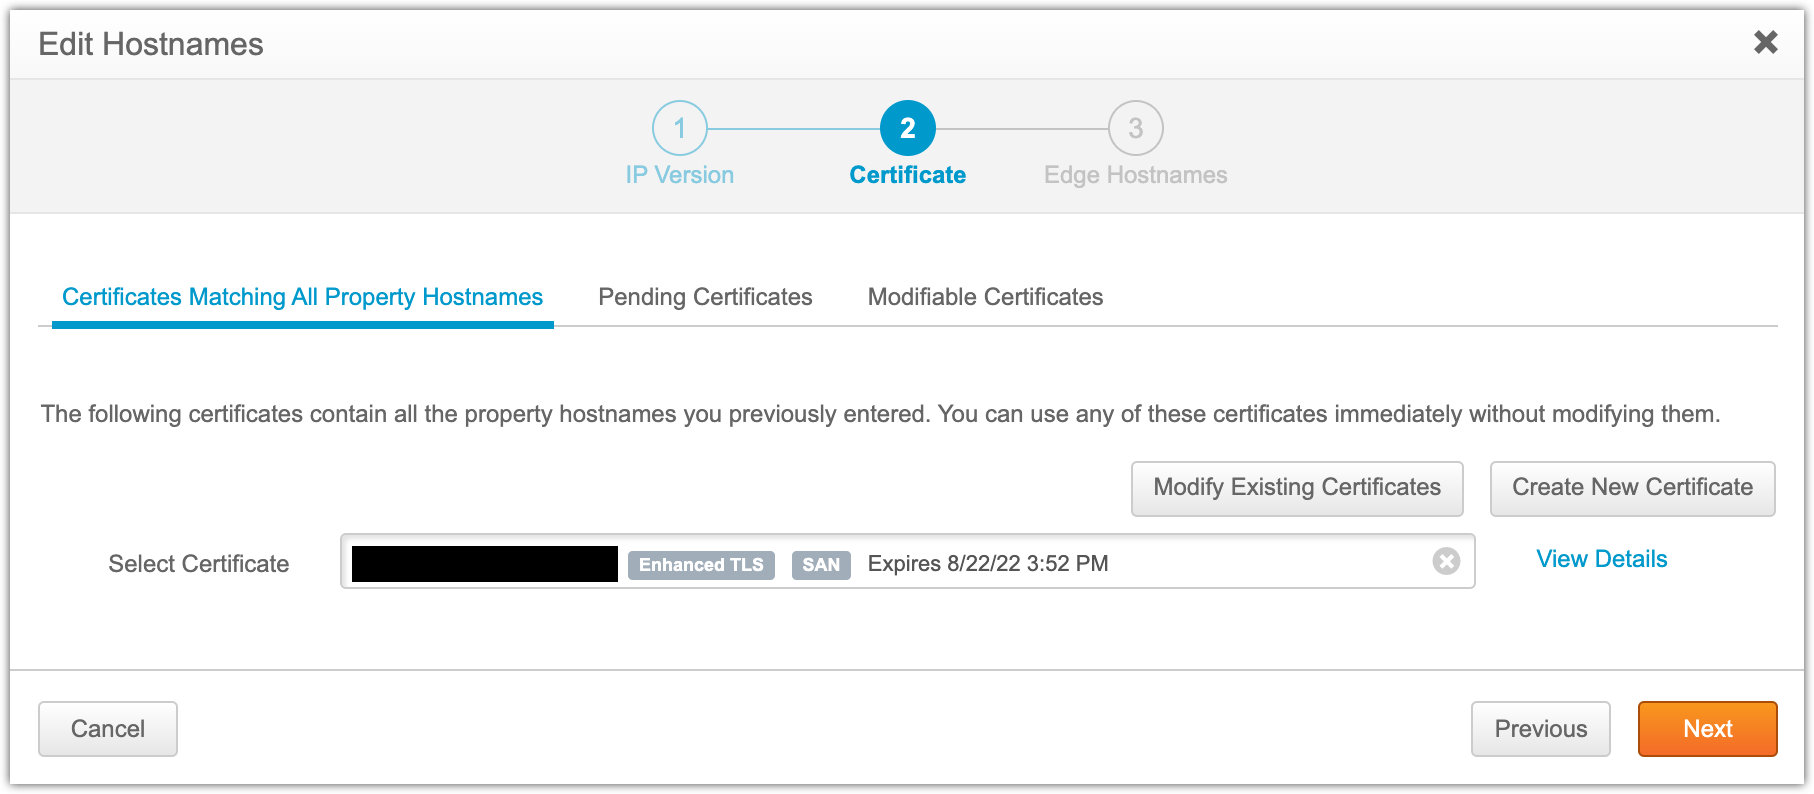
Click Next.
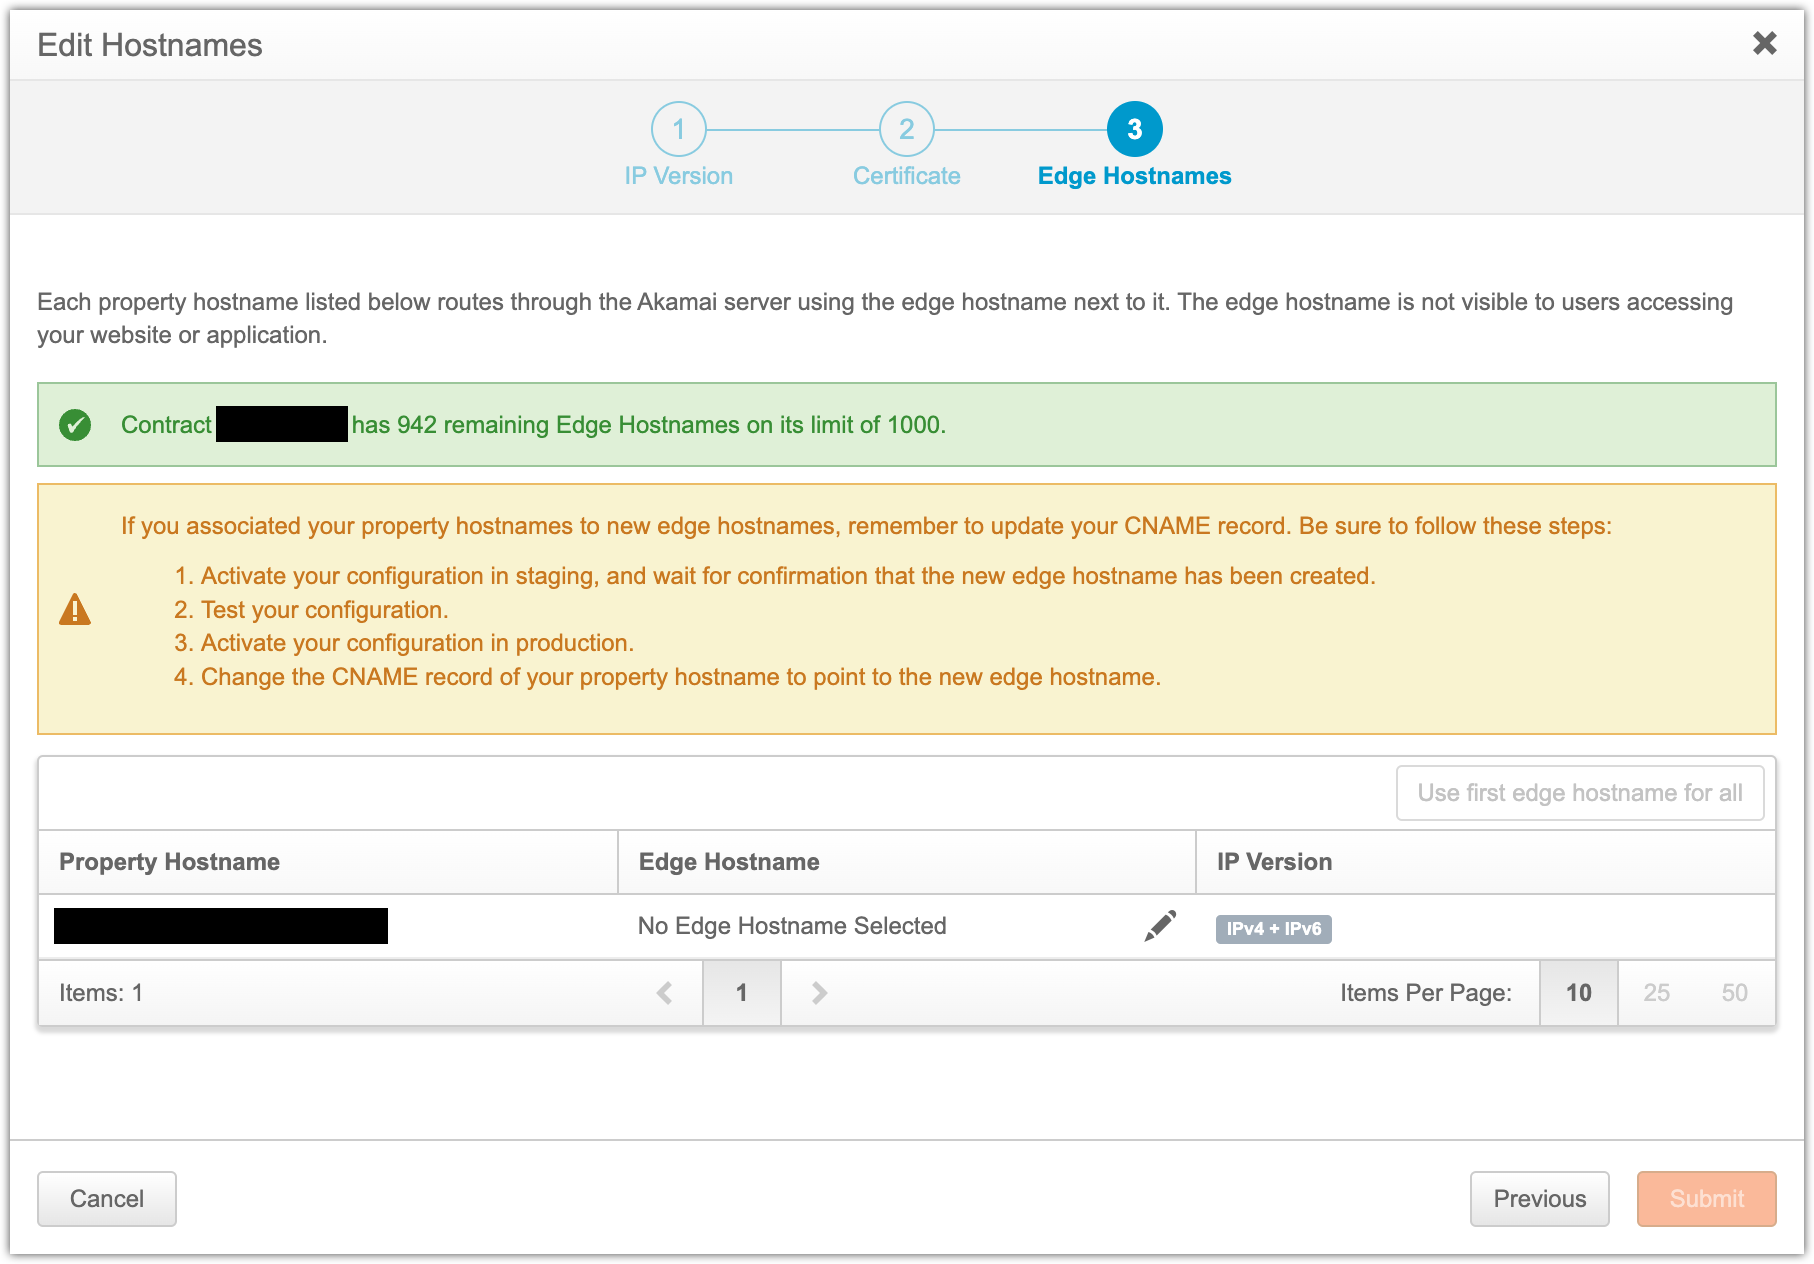
Click the pencil icon next to No Edge Hostname Selected.
Enter a value for the field Edge Hostname:
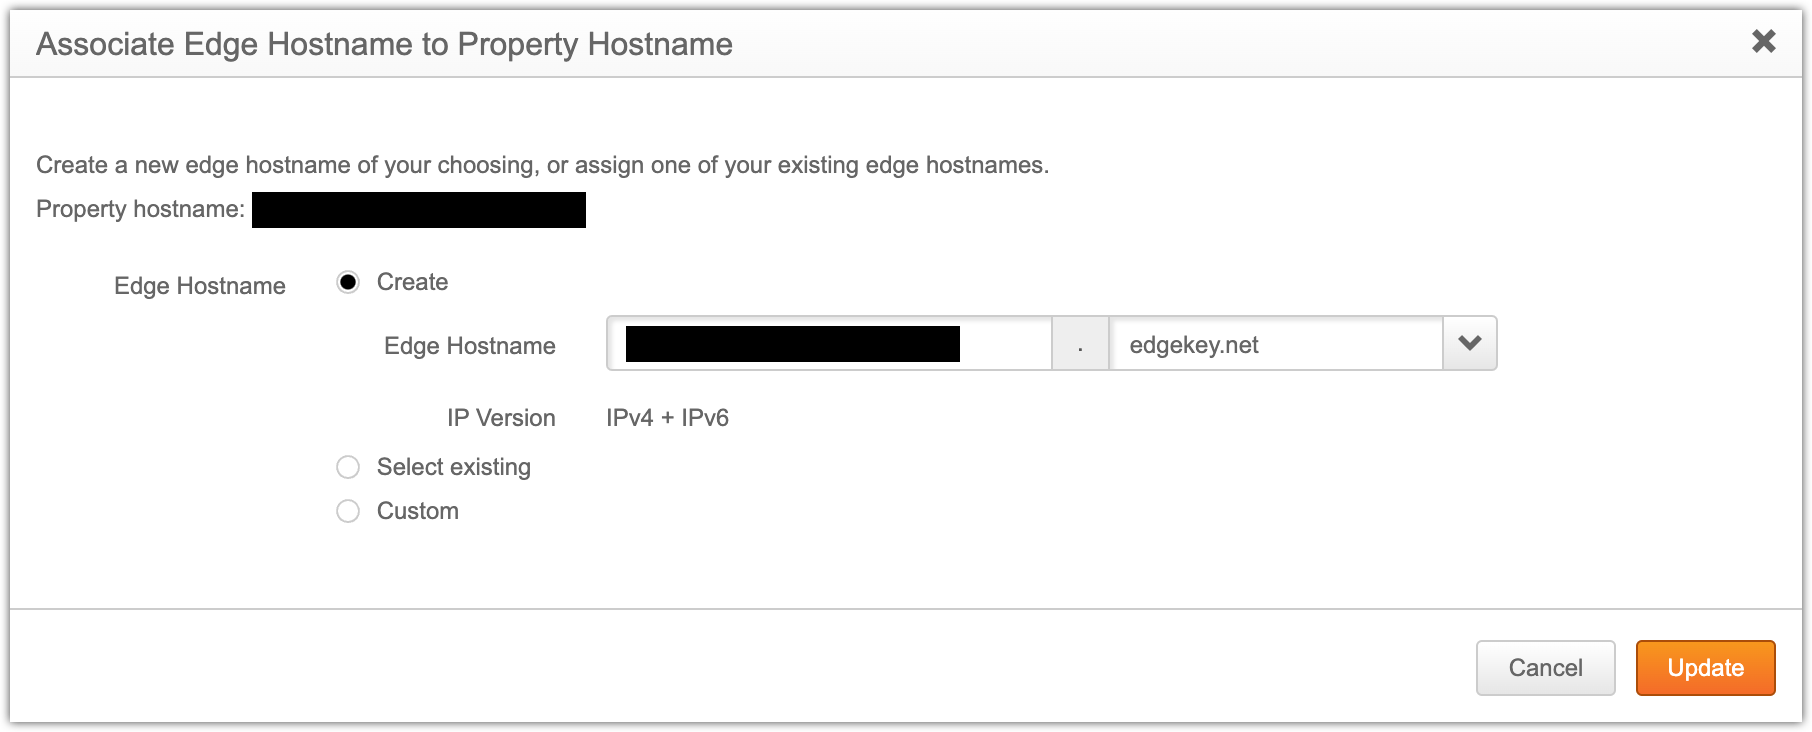
About this step
This is the hostname that Akamai uses across its own network. You will update DNS for your domain to map this internal hostname to the public hostname that visitors use to access your site.
Click Update.
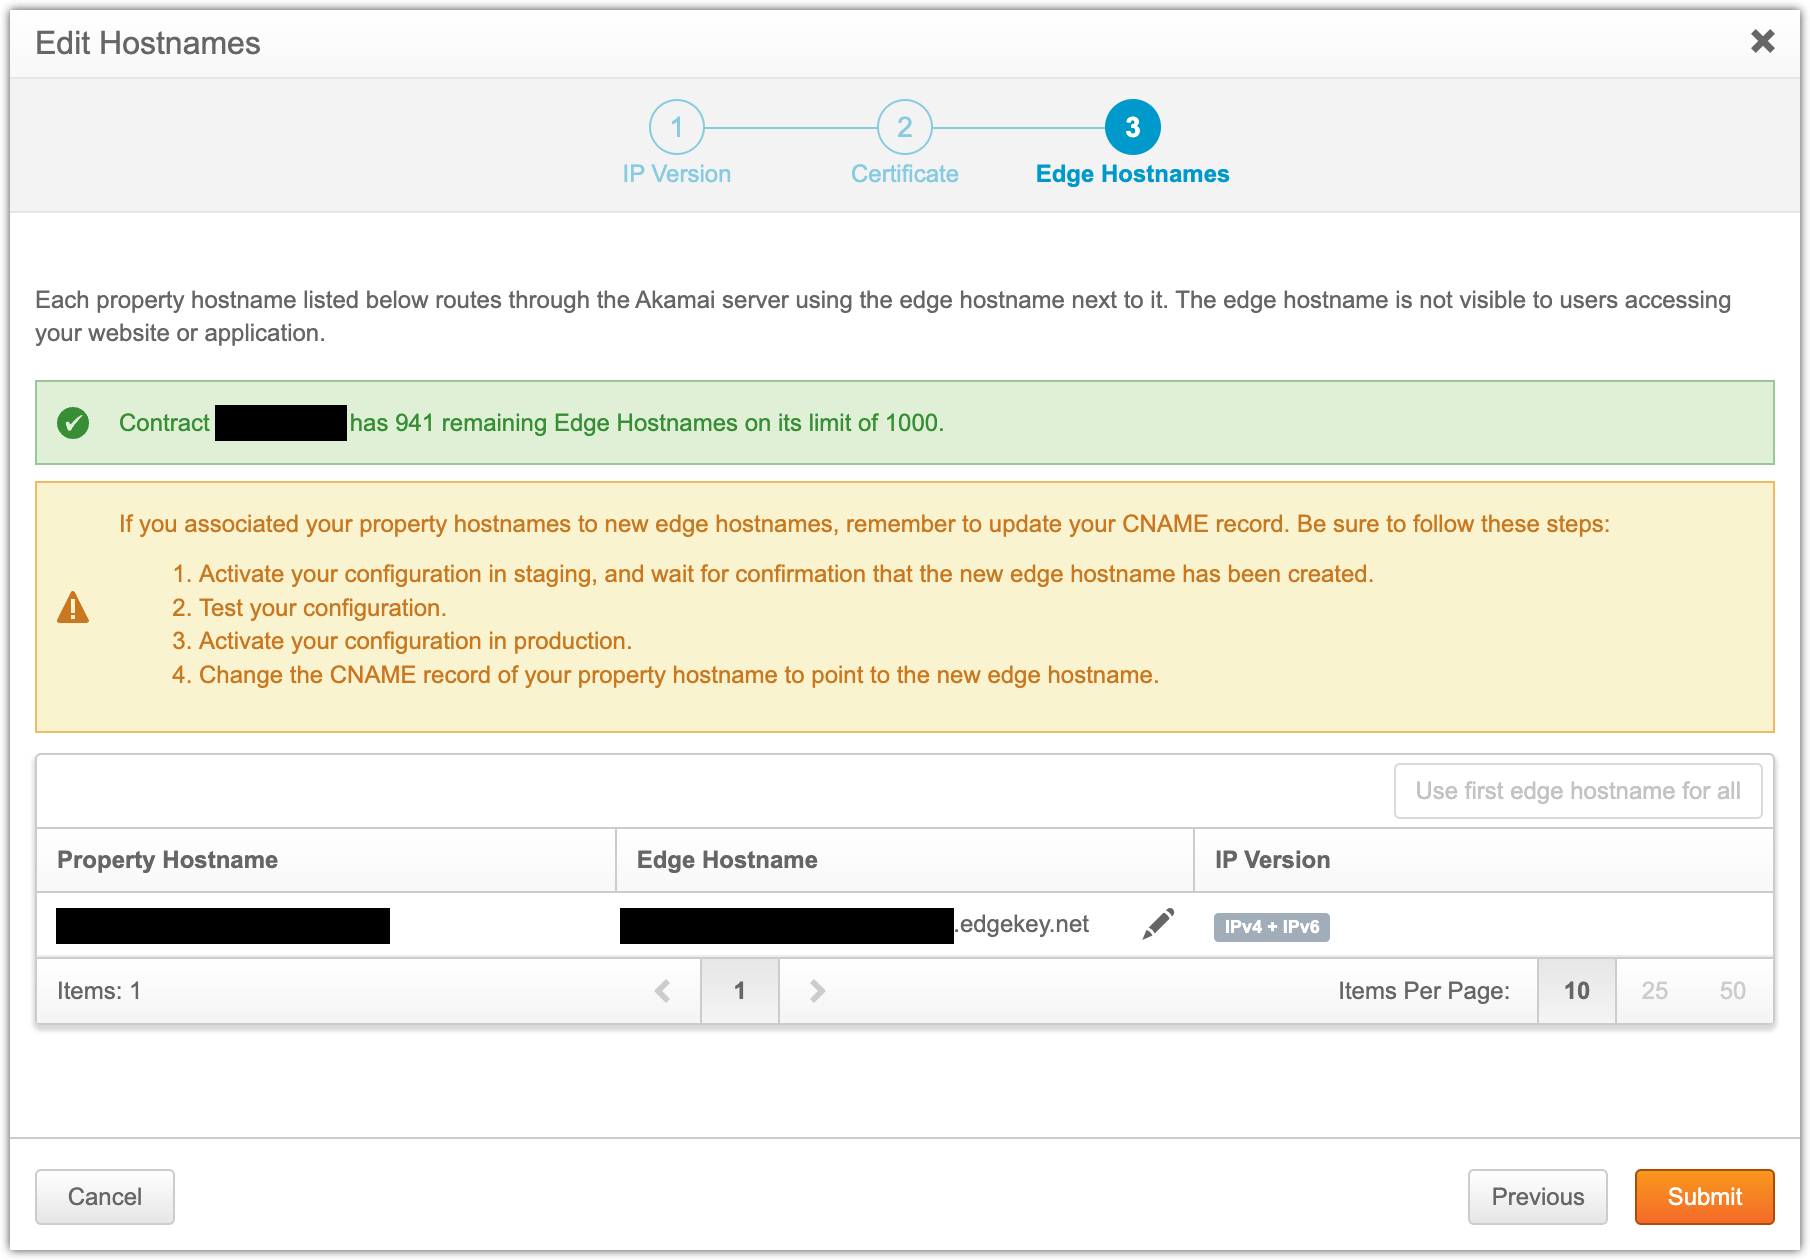
About this step
In your DNS, add a CNAME record for your property hostname to associate the Akamai edge hostname.
Click Submit.
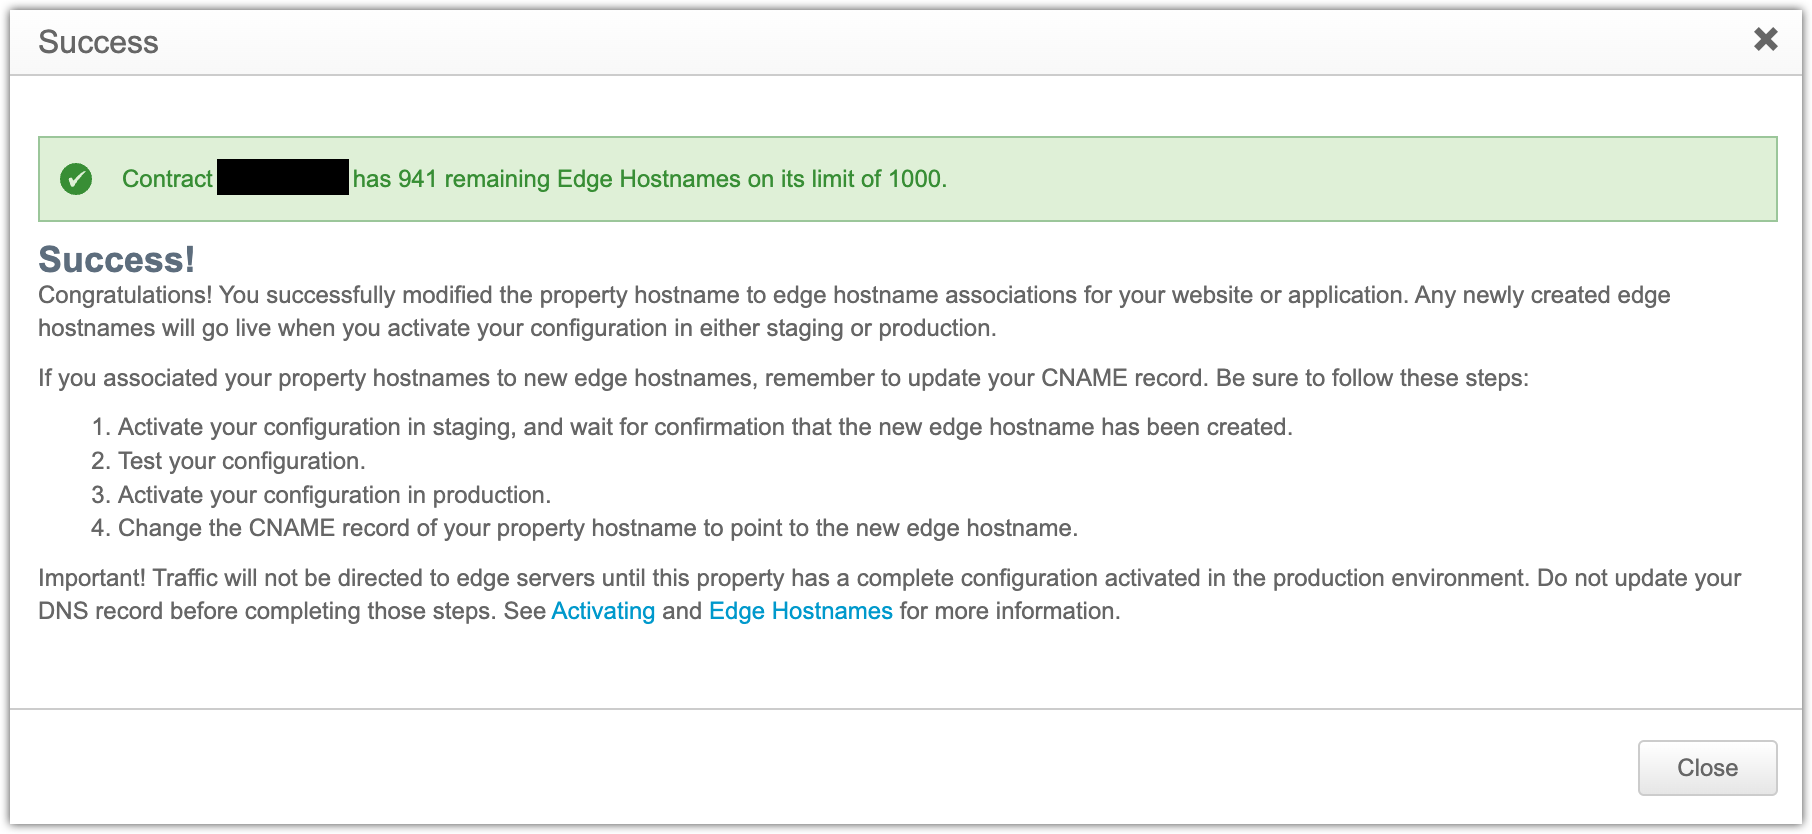
Click Close.
Click Save.
Activate property
Before your changes are available on Akamai, you must activate your property. You can activate on either the staging or production environment.
- Staging
- Production
akamai property-manager activate -n staging
akamai property-manager activate -n production
About this step
It can take 15 minutes or longer for the property to be activated. You can check the activation status using the following command:
akamai property-manager cs